Main Courses
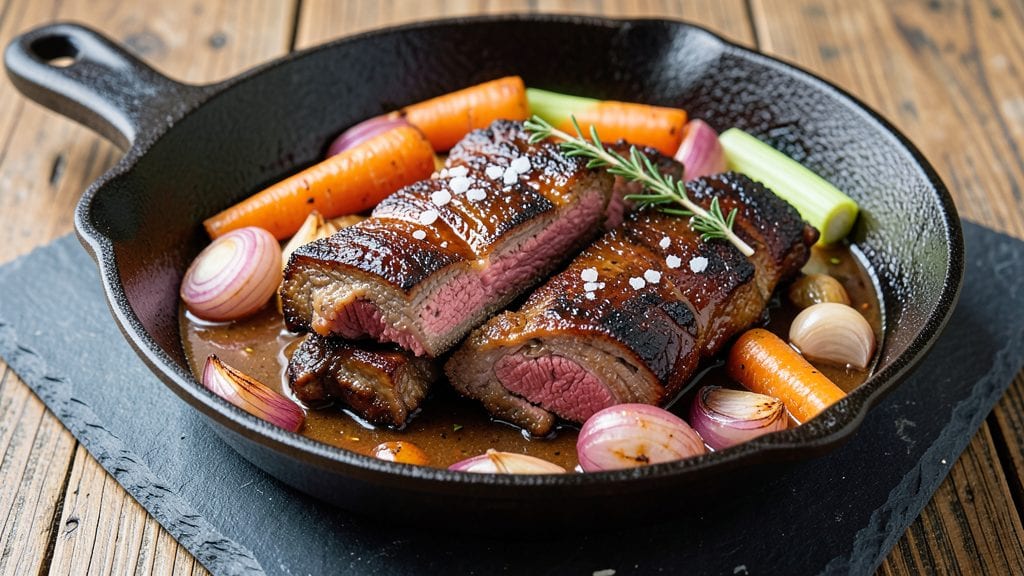
Creating beef short rib burnt ends transforms tough cuts into melt-in-your-mouth luxury with just six hours of hands-off cooking. This recipe delivers restaurant-quality results by mastering the caramelized "burnt ends" technique—where the edges become deep brown, almost charred, while the meat inside stays impossibly tender.
The secret lies in slow braising, precise searing, and reducing the sauce until it's rich and velvety, creating a dish that feels like a special occasion every time.
What makes these burnt ends truly exceptional is their depth of flavor—smoky from the sear, rich from the braising liquid, and intensified by the caramelized crust. Unlike quick weeknight meals, this dish rewards patience with every bite, making it perfect for gatherings or when you want to impress.
The process is straightforward once you understand the key steps, and the results are worth every minute of cook time.
By the end, you'll have fall-off-the-bone beef with a glossy, caramelized glaze that adds both visual appeal and layers of flavor. Serve it with creamy mashed potatoes, roasted root vegetables, or crusty bread to soak up every last drop of the sauce.
This isn't just a recipe—it's a technique that elevates simple ingredients into something extraordinary.
The beauty of burnt ends is their versatility. Use them in sandwiches, tacos, or even as a hearty appetizer. Once you master this method, you'll find yourself reaching for beef short ribs whenever you crave a dish that feels indulgent yet satisfying. Let's get started on creating this showstopper.
Ingredients for beef short rib burnt ends
Six ingredients transform tough beef into melt-in-your-mouth luxury with just six hours of hands-off cooking.
| Ingredient | Amount | Notes |
|---|---|---|
| Beef Short Ribs 🥩 | 4 lb | Bone-in, cut into 2-inch chunks |
| Yellow Onions 🧅 | 2 whole | Yellow or red, sliced into wedges |
| Carrots 🥕 | 4 whole | Large, cut into 2-inch chunks |
| Celery Stalks 🧅 | 4 whole | Cut into 2-inch pieces |
| Garlic Cloves 🧄 | 8 cloves | Peeled, smashed |
| Beef Broth 💧 | 4 cups | Low-sodium preferred |
| Red Wine 🍷 | 2 cups | Dry, like Cabernet Sauvignon |
| Tomato Paste 🍅 | ½ cup | Smooth, not chunky |
| Kosher Salt 🧂 | 2 tbsp | Diamond Crystal preferred |
| Black Peppercorns 🌶️ | 1 tbsp | Freshly cracked |
| Fresh Thyme 🌿 | ½ oz | Stems removed, leaves chopped |
| Fresh Rosemary 🌿 | ¼ oz | Needles finely chopped |
| Extra-Virgin Olive Oil 🫒 | ¼ cup | High-quality, fruity |
| Balsamic Vinegar 🍷 | 2 tbsp | Aged, for finishing |
| Cornstarch 🌾 | 2 tbsp | For thickening sauce |
The beef short ribs are non-negotiable—look for bone-in cuts with good marbling at your butcher shop or Costco. Whole Foods or Trader Joe's often carry pre-cut chunks, but if you're buying whole ribs, ask for them to be cut into 2-inch pieces. The flavor difference between dry-aged and wet-aged is noticeable, but wet-aged works fine if you're on a budget. For the vegetables, yellow onions and carrots should be firm with no soft spots—those sad, wilted veggies from the back of the produce section won't cut it here. Fresh thyme and rosemary? Grab them from the grocery store's fresh herb section—they're usually cheaper than the pre-packaged stuff, and you'll use more than you think.
No red wine? Substitute beef broth with a splash of balsamic vinegar—it adds depth without the alcohol. Fresh herbs wilt fast? Dried thyme at one-third the amount works, but honestly, fresh is worth the extra minute to chop. The tomato paste can be that squeeze tube from Trader Joe's—no waste, and it keeps forever. For the cornstarch, arrowroot powder is a 1:1 swap if you prefer. The beef broth should be low-sodium—you're adding salt anyway, and you don't want to overdo it. If you're feeling fancy, homemade beef stock makes the sauce taste like heaven, but store-bought Kitchen Basics or Pacific Foods brands are solid.
This dish tastes even better the next day—make extra and freeze portions for lazy weeknights. The sauce thickens as it cools, so add a splash of water or broth if it's too stiff when reheating. Store the ribs and sauce separately in airtight containers for up to 5 days in the fridge. For longer storage, freeze the ribs in the sauce for up to 3 months. When reheating, cover the pot and simmer gently—no boiling or the sauce will break. The burnt ends reheat beautifully, but they're best served fresh off the stove with a drizzle of that glossy, caramelized sauce.
Why You'll Love This Recipe
- One-Pot Magic: I swear by this recipe because it’s all in one pot—no fussing with multiple pans or dishes. Just dump the short ribs, onions, carrots, and celery in a Dutch oven, add broth, and let it braise. Honestly, the cleanup is so minimal I’ll take it over any other beef dish.
- Crispy-Creamy Payoff: That crispy, caramelized edge on the short ribs? It’s worth every second of browning. The garlic and onions melt into the broth, turning it into a rich, savory sauce that makes every bite taste like a hug. Between us, this is the kind of dish that disappears faster than I can say “seconds?”
- Weeknight Hero: I make this when I’m too tired to plan but still want something impressive. It’s hearty enough for a Sunday dinner but simple enough for a Tuesday night when takeout menus feel overwhelming. Plus, the leftovers? They’re even better the next day—perfect for lazy lunches.
- Budget Luxury: Short ribs are cheaper than they look, and this recipe stretches them far. The veggies (onions, carrots, celery) bulk it up without costing a fortune, and the flavor? It’s restaurant-quality without the price tag. I’ll be real: this is my go-to when I want to feel fancy on a tight budget.
Step-by-step instructions for beef short rib burnt ends
Here's how to transform tough short ribs into melt-in-your-mouth burnt ends with rich, velvety sauce.
Sear the Short Ribs for Maximum Flavor
Pat the 4 lb beef short ribs dry with paper towels—this ensures a better crust. Heat the 0.25 cup extra-virgin olive oil in a heavy Dutch oven over medium-high heat until shimmering. Working in batches if needed, sear the ribs on all sides until deep golden brown, about 3-4 minutes per side. The goal is to develop that caramelized crust that'll pack so much flavor into every bite.
As they sear, don't overcrowd the pan—give each piece room to breathe. If the pan gets too crowded, the ribs will steam instead of sear. Transfer the seared ribs to a plate and set aside. You'll know they're ready when they release easily from the pan and have developed that beautiful mahogany color.
Build the Aromatic Base with Vegetables and Wine
In the same Dutch oven, add the sliced 2 whole yellow onions, 4 whole carrots cut into chunks, and 4 whole celery stalks chopped into pieces. Sauté for 5-6 minutes until the vegetables begin to soften and take on color. Add the 8 cloves smashed garlic and cook for another 30 seconds until fragrant.
Deglaze the pan immediately with the 2 cups red wine, scraping up all those browned bits from the bottom. Let the wine reduce by half—you'll see it go from deep ruby to a concentrated glaze. This step captures all the meaty flavors that would otherwise burn off. The wine should smell rich and slightly boozy, with notes of the vegetables you just cooked.
Simmer the Ribs Low and Slow
Return the seared ribs to the Dutch oven. Stir in the 0.5 cup tomato paste, 2 tbsp kosher salt, 1 tbsp freshly cracked black peppercorns, 0.5 oz chopped fresh thyme, and 0.25 oz chopped fresh rosemary. Pour in the 4 cups beef broth and bring to a gentle simmer. The liquid should just barely bubble at the edges.
Cover the pot and transfer to a preheated 300°F oven. Here's where patience pays off—braise the ribs for 4 hours. You'll know they're ready when they're fork-tender and the meat pulls away from the bone with just slight resistance. If you try to pull it apart now, it should separate easily but still have some structure.
Finish with Balsamic and Thicken the Sauce
Remove the ribs from the pot and transfer them to a plate. Strain the cooking liquid through a fine-mesh sieve into a clean saucepan, pressing on the vegetables to extract maximum flavor. Return the strained liquid to medium-high heat and bring to a boil. Whisk in the 2 tbsp cornstarch mixed with 2 tablespoons cold water to create a slurry.
Simmer for 3-4 minutes until the sauce thickens enough to coat the back of a spoon. Stir in the 2 tbsp balsamic vinegar and taste—adjust seasoning with additional salt or pepper if needed. The sauce should be rich, slightly tangy, and thick enough to cling to the ribs. Return the ribs to the sauce and let them absorb those final flavors for 5 minutes before serving.
Pro Tips For Making Beef Short Rib Burnt Ends
- Sear Ribs in Batches: High heat and a crowded pan turn your sear into a sad, greasy mess. Work in 2-3 batches—no more—so the oil stays hot enough to brown properly. I learned this the hard way when my first batch ended up steaming instead of crisping.
- Trim the Fat, Not the Flavor: Short ribs are fatty for a reason—don’t strip it all off. Leave the fat cap intact; it renders into the pot and keeps the meat juicy. Just trim the excess (the thickest layers) so it doesn’t burn before the ribs do.
- Deglaze with Red Wine: Skip the beer or broth—red wine cuts through the caramelized bits better. Add a splash (about ½ cup) after browning, let it bubble for 30 seconds, then add the broth. The acidity brightens the sauce and balances the richness.
- Simmer Low and Slow: This isn’t a race. After the initial sear and deglaze, reduce heat to low and let it bubble gently for 2.5–3 hours. I used to crank the heat, thinking it’d speed things up, but the ribs turned tough. Patience here makes all the difference.
Perfect pairings for this dish
Classic Side Pairings
Creamy mashed potatoes are a must—their buttery texture contrasts perfectly with the caramelized edges of the burnt ends. I like using Yukon Gold potatoes boiled until tender, then mashed with ½ cup sour cream, ¼ cup unsalted butter, and a pinch of fresh nutmeg.
For extra richness, fold in 2 oz sharp cheddar cheese while warm. 🥔
Roasted root vegetables add natural sweetness and balance the richness. Toss 2 cups baby carrots, 2 cups parsnips, and 1 large sweet potato in 2 tbsp olive oil, 1 tsp smoked paprika, and ½ tsp kosher salt.
Roast at 400°F for 35 minutes until caramelized. The earthy flavors complement the beef beautifully.
Bread and Starch Options
Crusty sourdough bread is ideal for soaking up the sauce—its tangy bite cuts through the richness. Toast a baguette at 375°F for 5 minutes until golden, then serve with extra sauce for dipping. For a heartier option, try garlic mashed potatoes with a sprinkle of crispy fried onions on top.
Fresh Garnishes
Brighten the plate with chopped fresh parsley or thyme leaves—just 2 tbsp adds freshness and pops of color. A drizzle of aged balsamic glaze (reduce ¼ cup balsamic vinegar to a syrup) elevates the dish instantly.
For a smoky touch, sprinkle with crumbled blue cheese or crispy fried shallots.
Wine Pairings
A bold Cabernet Sauvignon from Napa Valley stands up to the dish’s richness. Look for a 2018 or newer vintage with notes of blackberry and vanilla. For a lighter option, try a Syrah from Washington State—its peppery notes complement the caramelized edges. 🍷
Beer Pairings
A dark amber ale like Fat Tire or Samuel Adams Boston Lager balances the dish’s depth with malty sweetness. For craft beer lovers, a Belgian-style dubbel with caramel and spice notes works beautifully. Avoid heavy stouts—they can overpower the delicate sauce.
Nutrition facts
Frequently asked questions about beef short rib burnt ends
Why do the edges need to be caramelized for burnt ends?
The caramelized edges create a deep, rich flavor that contrasts perfectly with the tender meat inside. This technique concentrates the natural sugars and collagen from the beef, creating a glossy, almost charred crust that adds layers of complexity. The process transforms tough cuts into melt-in-your-mouth bites while keeping the center juicy and fall-off-the-bone tender.
Can I make burnt ends in a slow cooker instead of an oven?
Yes, but with adjustments! Sear the ribs first in a skillet, then transfer them to your slow cooker with all the braising ingredients. Cook on low for 8 hours or high for 5-6 hours. The sauce will be thinner, so reduce it separately on the stovetop after cooking. The meat will still be tender, though the caramelization won't be as pronounced as with oven braising.
What's the best way to reheat leftover burnt ends?
Place ribs and sauce in a covered pot over medium-low heat and reheat gently for 10-15 minutes, stirring occasionally. Avoid high heat—the sauce can break and become grainy. For extra richness, add 1-2 tbsp beef broth if the sauce thickens too much. The ribs reheat beautifully and taste even better the next day!
How do I get the perfect caramelized crust without burning?
Watch the oven temperature closely—300°F is ideal for slow braising. If the edges brown too quickly, reduce heat to 275°F. The key is patience: let the ribs cook low and slow for 4 hours before checking. The crust should be deep brown but not blackened. If needed, broil for 2-3 minutes at the end to enhance caramelization.
Can I use beef chuck roast instead of short ribs?
Technically yes, but the texture and flavor will differ. Chuck roast has less connective tissue, so it won't become as tender. For best results, cut it into 2-inch cubes and follow the same braising method. The meat will be juicy but may not have the same rich, beefy depth as short ribs. For authentic burnt ends, stick with the original cut.