Sauces & Condiments
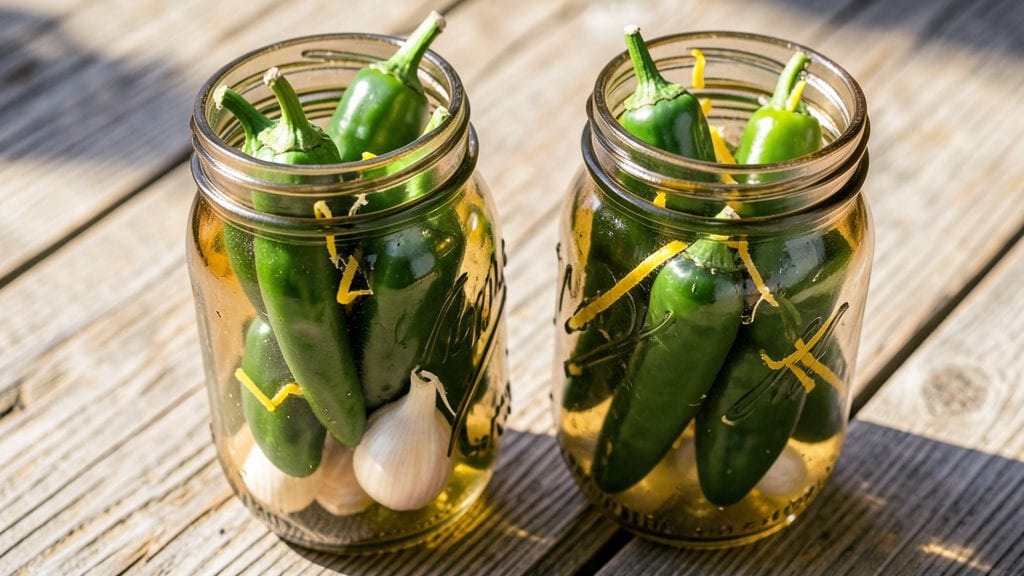
This simple pickled jalapeño peppers recipe transforms fresh peppers into tangy, crunchy bites that add heat and brightness to everything from tacos to cocktails. The process is straightforward—just 10 minutes of prep followed by a quick sterilization—but the results are restaurant-quality condiments you’ll reach for again and again.
I’ve perfected this method to ensure safe, flavorful pickles every time, with no fancy equipment required.
The key to great pickled jalapeños lies in the brine: a precise balance of vinegar, water, and salt creates the ideal acidic environment for preservation while allowing the peppers to absorb bold flavors.
You can customize the brine with garlic, lime zest, or a touch of honey for variations that suit your taste. Sterilizing jars and using the proper brine ratios are critical for safety—this isn’t just about flavor, but also preventing spoilage.
What you’ll end up with is a jar of vibrant green peppers that pack a punch—crisp, tangy, and ready to elevate any dish. These pickles stay fresh for months in the refrigerator, making them a versatile pantry staple.
Whether you’re adding them to margaritas, sprinkling them over nachos, or using them as a garnish, their bright heat will become a go-to flavor booster.
This method is foolproof for beginners but refined enough for seasoned cooks—no special skills needed, just attention to detail. Let’s get started on making your own batch of simple, safe, and delicious pickled jalapeños.
Ingredients for simple pickled jalapeno peppers
Pantry basics plus fresh peppers—no fancy gear needed for these tangy, crunchy bites.
| Ingredient | Amount | Notes |
|---|---|---|
| Fresh Jalapeño Peppers 🌶️ | 12 whole | Medium heat variety preferred |
| White Vinegar 💧 | 2 cups | Distilled white preferred |
| Water 💧 | 2 cups | Filtered or bottled |
| Sea Salt 🧂 | 1 ½ tbsp | Non-iodized preferred |
| Garlic Cloves 🧄 | 4 cloves | Smashed for infusion |
| Lime Zest 🍋 | 1 tbsp | From 1 medium lime |
| Granulated Sugar 🍯 | ½ cup | White or raw |
| Mason Jars 🍯 | 2 pieces | Pint size, sterilized |
| Fresh Cilantro Leaves 🌿 | ¼ cup | Optional garnish |
Jalapeños are the star here, so grab the freshest you can find—Mexican markets often have the best selection. Look for peppers that are firm, vibrant green, and free of soft spots. The Ball or Kerr brand mason jars are my go-to for sterilization—they handle the heat well and seal tight. For the vinegar, distilled white is best, but apple cider vinegar works too if that's what you've got. The sugar isn't just for sweetness—it helps preserve the peppers while keeping them crisp. I always buy organic limes for the zest since conventional ones can be waxy.
No white vinegar? Apple cider or rice vinegar both work, but you might want to add an extra teaspoon of sugar to balance the flavor. Short on cilantro? Skip it entirely or use a pinch of dried oregano for a similar earthy note. Want more heat? Add a pinch of red pepper flakes to the jars before sealing. The garlic cloves can be peeled and minced if you prefer, but smashing them keeps things simple. If you're using glass jars, make sure they're clean and completely dry before sterilizing—moisture can cause seals to fail.
These pickles keep for up to 6 months in the fridge, but trust me, they won't last that long. Once opened, transfer to a smaller jar and store in the fridge—they'll stay good for about 2 weeks. I like to portion them into smaller jars so I can grab just what I need for tacos or margaritas without opening the whole batch. The flavor actually improves after the first week as the peppers soak up the brine. Freezing isn't recommended—they get mushy, but you can freeze the brine separately for up to 3 months if you want to make fresh peppers later.
Why You'll Love This Recipe
- No Chopping Needed: I swear by this—just slice the peppers, toss them in a jar, and let the vinegar do the work. No peeling, no fancy prep, just 10 minutes of hands-off magic.
- Garlic Kiss: That first bite? The vinegar cuts through the heat while the garlic cloves infuse the peppers with a warm, savory punch. Honestly, it’s the kind of flavor that makes you reach for seconds without thinking.
- Meal Prep MVP: I keep a jar in my fridge for tacos, sandwiches, or even scrambled eggs—it’s my go-to for adding a quick, tangy crunch. Between us, it’s the secret weapon in my lazy Sunday brunch rotation.
- Dollar Stretch: Five ingredients, zero waste. The peppers last weeks, and I’ve never paid more than $3 for the whole batch. It’s the kind of pantry staple that makes grocery day feel like a win.
Step-by-step instructions for simple pickled jalapeño peppers
Here's the straightforward method that delivers perfectly crisp jalapeños in record time.
Sterilize Jars and Prepare Peppers
Start by washing the 2 pieces mason jars and their lids in hot, soapy water, then rinse thoroughly. Place them upside down on a baking sheet and bake at 375°F for 10 minutes to sterilize. While they're heating, carefully wash the 12 whole fresh jalapeño peppers and remove stems, leaving the peppers whole.
For extra flavor, make a small slit along one side of each pepper with a sharp knife, just enough to let the brine penetrate. This simple step ensures the peppers stay crisp instead of turning mushy. Keep the peppers at room temperature while you prepare the brine.
Create the Perfect Brine Mixture
In a medium saucepan, combine the 2 cups white vinegar, 2 cups water, 1.5 tablespoons sea salt, 0.5 cup granulated sugar, 4 smashed garlic cloves, and 1 tablespoon lime zest. Stir until the sugar and salt are completely dissolved. You'll notice the mixture becomes slightly cloudy—this is normal and indicates proper dissolution.
Bring the brine to a gentle boil over medium heat, then immediately reduce to a simmer. Let it cook for 5 minutes to infuse all the flavors together. You'll smell the garlic and lime zest releasing their aromas—this is when the magic happens. Keep the heat low enough to maintain a gentle simmer, not a rolling boil.
Pack and Preserve the Jalapeños
Using tongs, carefully place the 12 whole jalapeño peppers into the sterilized mason jars, packing them tightly but not forcing them. You want them standing upright if possible, but they can also lay on their sides if needed. Divide the peppers evenly between the 2 jars—about 6 peppers per jar.
Pour the hot brine over the peppers in each jar, filling them to about ½ inch from the top. This headspace prevents mold growth during storage. Let the jars cool completely at room temperature before processing further.
Seal and Store for Maximum Freshness
Once the jars have cooled completely, wipe the rims with a clean, damp paper towel to remove any residue. Place the lids on the jars and screw on the bands until they're fingertip-tight—don't over-tighten or the jars might not seal properly. You'll hear a satisfying "ping" sound when they seal, indicating a proper vacuum seal.
Store the sealed jars in a cool, dark place for at least 24 hours before using. This resting period allows the flavors to meld completely. Your pickled jalapeños will stay fresh in the refrigerator for up to 3 months, ready to add crunchy heat to tacos, margaritas, or any dish that needs a spicy kick.
Pro Tips For Making Simple Pickled Jalapeno Peppers
- STEAM THE PEPPERS FIRST: Slit the jalapeños lengthwise, then drop them into boiling water for 30 seconds before packing them into jars. I learned this the hard way—skipping it means uneven pickling and peppers that stay stubbornly crunchy instead of tender. (Yes, even if you're impatient like me, resist the urge to skip.)
- USE 1:1 VINEGAR TO WATER: Equal parts white vinegar and water isn’t just a rule—it’s the ratio that actually works. I used to eyeball it and ended up with either too tangy or too watery jars. Measure it out like you’re making a cocktail: 50/50, no excuses.
- SALT THE GARLIC: Toss your crushed garlic cloves in a pinch of salt before adding them to the jar. It keeps them from floating to the top like lazy little cloves and ensures every bite gets that punchy flavor. (Your future self will thank you.)
- STORE THE LIQUID SEPARATELY: Pour the vinegar brine into a clean bottle before sealing the jars. This way, you can reuse the liquid for future batches or even drizzle it over tacos—no wasted tang. (I used to ignore this and now I have a fridge full of half-empty jars.)
Regional styles of this recipe
Mexican Street Style
In Mexico, pickled jalapeños often get a smoky, earthy twist with chipotle powder or guajillo chiles in the brine. I like to add 1 teaspoon chipotle powder and 1 dried guajillo chile (toasted and removed) to the brine for depth.
Serve these with tacos al pastor or sprinkle over chilaquiles for that authentic street-food vibe. 🌶️
Southern U.S. Heat
Down South, pickled jalapeños take on a tangy, slightly sweet profile with mustard seeds and black peppercorns. Add ½ teaspoon mustard seeds and ½ teaspoon black peppercorns to the brine, along with 1 tablespoon honey instead of sugar.
These work perfectly with fried chicken or BBQ pulled pork sandwiches—the heat cuts through the richness beautifully.
Caribbean Citrus Twist
For a tropical flair, swap the lime zest for orange zest and add 1 tablespoon grated ginger to the brine. A splash of rum (about 2 tablespoons) infuses the peppers with warm, spiced notes.
These pair wonderfully with grilled mahi-mahi or rum cocktails like a Mojito. The ginger keeps the peppers crisp while adding a zesty kick.
Tex-Mex Fusion
Tex-Mex style pickled jalapeños often include cilantro and cumin in the brine. Toss ½ cup chopped cilantro and 1 teaspoon ground cumin into the jars before adding the brine. These are a must for queso dip or breakfast burritos—the cumin adds warmth, while the cilantro brightens the heat.
I like to add 1 sliced jalapeño per jar for extra crunch.
Asian-Inspired Umami
For an Asian-inspired variation, replace the garlic with fresh ginger and add 1 tablespoon fish sauce to the brine. A pinch of Sichuan peppercorns (if available) adds a subtle numbing heat.
These peppers shine in Vietnamese pho or Thai green papaya salad—the umami depth balances the spice perfectly. Use rice vinegar instead of white vinegar for a milder acidity.
Classic Midwest Crunch
The Midwest often prefers a simpler, crunchier pickle with dill weed and celery seeds. Add 1 tablespoon dill weed and ½ teaspoon celery seeds to the brine, along with a splash of apple cider vinegar.
These are ideal for Reuben sandwiches or cheeseburgers—the dill adds a fresh, herbal note that complements the jalapeño’s heat without overpowering it.
Nutrition facts
Frequently asked questions
Why do my pickled jalapeños turn soft instead of staying crisp?
Overcrowding jars or not leaving enough headspace (½ inch) lets air get trapped, causing peppers to soften. Always pack peppers tightly but upright, and ensure the brine covers them completely. For extra crunch, make a small slit in each pepper before pickling to let the brine penetrate evenly.
Can I use apple cider vinegar instead of white vinegar?
Yes! Apple cider vinegar works perfectly and adds a subtle sweetness. Just reduce the sugar to ¼ cup since it’s already slightly sweet. The acidity remains strong enough for safe preservation, but the flavor profile will be milder and fruitier.
How do I adjust the heat level for milder or spicier pickles?
For milder peppers, remove seeds and membranes before pickling. For extra heat, leave seeds intact or add ½ teaspoon red pepper flakes to the brine. You can also swap jalapeños for serrano peppers for a sharper kick.
Do I need to sterilize the jars if I’m storing them in the fridge?
While refrigeration slows spoilage, sterilizing jars is still critical to prevent mold or bacteria. Bake jars at 375°F for 10 minutes or boil lids for 5 minutes—this ensures a safe seal. The 24-hour resting period before eating also helps flavors meld safely.
What’s the best way to use up pickled jalapeños quickly?
Slice them thin for tacos, blend into salsa, or chop for Bloody Marys and margaritas. For a quick snack, mix with cream cheese and spread on toast. They also elevate grilled meats, soups, and even deviled eggs—any dish needing a tangy, spicy boost!