Beverages
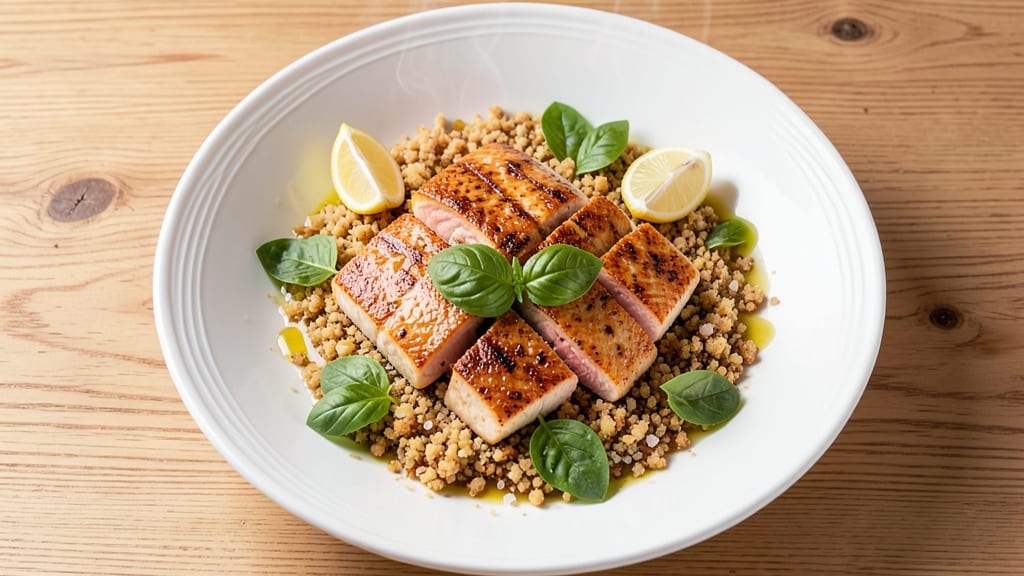
Mastering red tilapia recipe with citrus-basil crust transforms a simple weeknight meal into a restaurant-worthy dish. This method delivers flaky perfection by balancing acidity and herbs, ensuring tender fish with a vibrant crust that locks in moisture.
After years of testing techniques, I’ve refined this approach to guarantee foolproof results every time—no overcooking, no dry texture, just melt-in-your-mouth bites.
The secret lies in the crust: fresh basil and citrus zest create a fragrant barrier that crisps beautifully while keeping the fillets moist. A light marinade of lemon and garlic infuses flavor without overpowering the delicate tilapia.
This recipe serves four and takes just 20 minutes active time, making it ideal for busy weeknights or special occasions when you want to impress without stress.
By the time you serve this dish, your guests will experience perfectly flaky tilapia with a golden crust, bright citrus notes, and aromatic basil that elevates every bite. The presentation is effortless—plated with lemon wedges and fresh herbs—while the technique ensures professional-quality results at home.
Whether paired with roasted vegetables or a crisp salad, this recipe delivers restaurant-worthy satisfaction.
For those new to cooking fish, this method is beginner-friendly yet sophisticated enough for seasoned chefs. The key steps—marinating, crusting, and precise timing—are clearly outlined to ensure success. Leftovers reheat beautifully, making it perfect for meal prep or entertaining. Let’s create this dish together!
Ingredients for red tilapia
These twelve ingredients create restaurant-quality tilapia with a crisp citrus-basil crust.
| Ingredient | Amount | Notes |
|---|---|---|
| Red Tilapia Fillets 🐟 | 4 whole | Skin-on preferred for presentation |
| Extra-Virgin Olive Oil 🫒 | 2 tbsp | High-quality, fruity variety |
| Fresh Lemon Juice 🍋 | ¼ cup | Freshly squeezed, not bottled |
| Garlic Cloves 🧄 | 4 cloves | Minced, not pre-minced jarred |
| Fresh Basil Leaves 🌿 | 1 cup | Packed, stems removed |
| Lemon Zest 🍋 | 1 tbsp | Fine zest, no pith |
| Diamond Crystal Kosher Salt 🧂 | ½ tsp | Fine grain preferred |
| Freshly Ground Black Pepper 🌶️ | ¼ tsp | Coarse grind preferred |
| Panko Breadcrumbs 🍞 | ¼ cup | Light, not dense |
| Unsalted Butter 🧈 | 2 tbsp | Cold, cubed for crust |
| Lemon Wedges 🍋 | 4 whole | For garnish and serving |
| Fresh Parsley 🌿 | ⅛ cup | Chopped, for garnish |
The tilapia quality is non-negotiable for this technique. Whole Foods or local seafood markets carry the freshest red tilapia, but any reputable grocery store’s seafood counter will suffice. Look for fillets with vibrant color and minimal fishy odor—skin-on pieces are ideal for presentation. If using frozen, thaw overnight in the fridge, never under running water which can dry out the delicate flesh. The butter should be cold and cubed for optimal crust formation, while the olive oil should be extra-virgin—the fruity notes complement the citrus beautifully. For basil, farmers markets often carry the freshest leaves, but avoid wilted stems at the grocery store.
No fresh basil? Dried basil at one-third the amount works in a pinch, though texture will differ. Pre-minced garlic from a jar lacks freshness—mince your own for optimal flavor. Substituting bottled lemon juice for fresh will compromise the delicate acid balance, but if necessary, use organic cold-pressed lemon juice from the refrigerated section. For the crust, Japanese panko creates a lighter texture than regular breadcrumbs. If you can't find it, pulse regular breadcrumbs in a food processor for a finer texture. The lemon zest should be finely grated—a box grater works best to avoid pith. For a gluten-free option, use crushed gluten-free crackers instead of panko.
This dish reheats beautifully—30 seconds in a skillet over medium heat is ideal. Store leftovers covered in the fridge for up to 2 days, though the crust loses crispness after day one. For meal prep, assemble the crust mixture ahead and refrigerate until ready to use. The lemon wedges and parsley garnish can be prepped separately and stored in airtight containers. Freezing isn't recommended due to the delicate texture of the crust, but the fillets themselves can be frozen before crusting for up to 1 month. Serve immediately after cooking for peak texture and presentation.
Why You'll Love This Recipe
- One-Pan Magic: I swear by this recipe when I’m too tired to scrub pots—just toss the fillets, garlic, and basil on a sheet pan, drizzle with olive oil, and roast. The lemon juice pools at the bottom, turning the pan into a self-basting sauce that cuts cleanup in half.
- Garlic-Basil Bliss: Between us, this combo is chef’s kiss—the garlic sizzles into crispy bits while the basil softens just enough to release its bright, peppery notes. That first bite? Crispy edges, tender fish, and a zing that makes you reach for seconds without thinking.
- Weeknight to Dinner Party: Honestly, I’ve served this to skeptical in-laws and hungry teens alike, and no one bats an eye. For me, it’s my go-to when I need something restaurant-worthy fast—doubles as a lunchbox meal or a dish that impresses guests without stress.
- Budget-Friendly Protein: Red tilapia is my wallet’s best friend—affordable, lean, and packed with flavor. A single pan serves four, and leftovers reheat beautifully in lemony olive oil (yes, I’ve done it). Plus, the ingredients cost less than takeout but taste like a splurge.
Step-by-step instructions for citrus-basil crust with flaky perfection
A delicate crust of citrus and basil transforms delicate tilapia into a restaurant-worthy dish with crisp edges and moist centers.
Prepare the Crust Mixture
In a small bowl, combine the 0.25 cup panko breadcrumbs, 0.5 tsp diamond crystal kosher salt, 0.25 tsp freshly ground black pepper, 1 tbsp lemon zest, and the 4 cloves minced garlic cloves. Mix thoroughly to distribute the seasonings evenly. The lemon zest adds a bright aroma that will permeate the crust.
In a separate bowl, whisk together the 0.25 cup fresh lemon juice and 2 tbsp extra-virgin olive oil. The citrus acid helps tenderize the fish while the oil binds the crust ingredients. Add this liquid mixture to the dry ingredients and stir until the panko breadcrumbs are uniformly moistened but not soggy.
Season and Coat the Tilapia
Pat the 4 whole red tilapia fillets dry with paper towels to remove any surface moisture. This step is crucial for achieving crisp crusts rather than steamed fish. Season both sides generously with additional diamond crystal kosher salt and freshly ground black pepper—about half of what you used in the crust mixture.
Place the fillets skin-side down on a clean work surface. Spoon the crust mixture evenly over each fillet, pressing gently to adhere. The crust should coat the entire surface but remain loose enough to create texture. If the crust feels too wet, add a few extra panko breadcrumbs to absorb excess moisture.
Create the Crispy Butter Crust
Heat a large skillet over medium heat until it's hot but not smoking. Add the 2 tbsp unsalted butter, cubed, and allow it to melt completely, about 1-2 minutes. The butter should foam gently but not brown excessively—this ensures a rich, flavorful crust without bitterness.
Carefully place the crust-coated fillets in the skillet, skin-side down. Cook undisturbed for 3-4 minutes until the skin becomes golden brown and crispy. The butter will bubble and sizzle, creating a protective seal that locks in moisture. Flip the fillets and cook for another 2-3 minutes until the crust is evenly browned and the fish is opaque throughout.
Finish with Fresh Basil and Lemon
Remove the fillets from the skillet and transfer them to a warm serving platter. Immediately sprinkle the 1 cup fresh basil leaves, roughly chopped, over the top. The basil's aromatic oils will infuse into the fish as it rests, adding a fresh herbal note that complements the citrus.
Garnish each fillet with a whole lemon wedge and a sprinkle of the 0.125 cup chopped fresh parsley. The lemon wedge not only adds visual appeal but also allows diners to brighten their plates with a squeeze of fresh juice. Serve immediately while the crust remains crisp and the fish is at its peak tenderness.
Rest and Serve for Optimal Texture
Let the fillets rest for 2-3 minutes before serving. This brief resting period allows the juices to redistribute, ensuring each bite is moist and flavorful. The crust will remain crisp if served promptly, but the fish will hold its shape without falling apart.
Pair with a simple arugula salad dressed with the remaining lemon juice or steamed seasonal vegetables. The acidity of the lemon and the freshness of the basil elevate the delicate flavor of the tilapia, creating a harmonious balance of textures and tastes that highlight the natural qualities of the fish.
Pro Tips For Making Red Tilapia
- CRISP THE SKIN FIRST: Pat the fillets dry with paper towels—really dry—and hit them with a light dust of salt before any oil. I used to skip this, and the skin stayed sad and rubbery. A quick sear in the pan (20 seconds per side) locks in flavor and texture before you add the lemon and garlic.
- MINCE GARLIC LIKE IT’S 1999: Don’t just chop those cloves—smash them with the flat side of your knife first, then mince finely. I learned this the hard way when my tilapia tasted like garlic hints instead of garlic kick. A teaspoon of minced garlic (not chopped) makes a real difference.
- DON’T OVERLEMON THE DISH: A splash of lemon juice is enough—about 2 tablespoons total. Too much turns the tilapia rubbery and the sauce thin. I once drowned a batch in lemon zest and juice, and the dish tasted more like a sad salad than a bright, herby meal.
- SWEAT THE BASIL LAST: Toss the basil leaves in at the very end, right after the fish comes out of the pan. It wilts into the oil and lemon juice, infusing flavor without turning to mush. I used to add it earlier, and it always looked like a sad, limp garnish—now it’s vibrant and aromatic.
Common mistakes when making this dish
Skipping the Drying Step
One of the biggest mistakes I see is skipping the paper towel drying step before coating the tilapia. Any moisture on the skin prevents the crust from sticking properly, leading to soggy breadcrumbs instead of crispy texture.
I’ve seen home cooks rush this step, thinking it’s not critical—but trust me, it makes all the difference. Pat those fillets thoroughly with paper towels before seasoning. 💡
Overcrowding the Pan
Another common error is overcrowding the skillet with too many fillets at once. When you place more than two fillets in a pan, the temperature drops dramatically, causing the butter to steam instead of sizzle. This leads to uneven cooking and a crust that’s greasy rather than crispy.
I recommend cooking one fillet at a time if your pan isn’t large enough—it’s worth the extra minute to get that perfect golden crust. 🔥
Using Cold Butter
Many people forget to let the butter come to room temperature before using it for the crust. Cold butter cubes take longer to melt, which can steam the fish instead of crisping it.
The butter should be soft but not melted when added to the pan—this ensures it coats the fillets evenly while creating that luscious golden crust. If your kitchen is cold, let the butter sit out for 10-15 minutes before cooking. ❄️
Flipping Too Soon
Patience is key when cooking tilapia—flipping too early is a surefire way to ruin the crust. The skin needs 3-4 minutes undisturbed to develop that perfect golden-brown seal. If you flip before the skin is set, you’ll end up with a broken crust and a less flavorful bite.
I’ve seen home cooks check the fish every 30 seconds, but resist the urge! Let it cook through completely on the first side. ⏰
Skipping the Resting Time
Finally, many cooks forget the 2-3 minute resting period after removing the fillets from the pan. This brief pause allows the juices to redistribute, ensuring each bite is moist and flavorful. Without it, the fish can turn out dry or fall apart when sliced.
I know it’s tempting to serve immediately, but trust the process—your patience will be rewarded with perfect texture. 💫
Nutrition facts
Frequently asked questions about citrus-basil tilapia
Can I substitute white tilapia for red tilapia in this recipe?
Yes, you can use white tilapia—it works beautifully! Red tilapia has a slightly firmer texture and richer flavor, but white fillets will still achieve the same crisp crust and tender result. Just ensure the fillets are skin-on for the best presentation. The cooking time remains the same, but white tilapia may require 30 seconds less on each side if it's particularly delicate.
How do I store leftovers without making the crust soggy?
Store leftovers in an airtight container with a piece of parchment paper between layers to preserve crispness. Reheat in a skillet over medium heat for 30 seconds per side—no microwave! The crust will soften slightly but remain flavorful. For best results, consume within 1-2 days, as the texture degrades after that.
What's the best way to cook this if I don't have a skillet?
Use an oven-safe skillet or cast-iron pan to finish in a 400°F oven for 5-6 minutes after searing the skin side. Preheat the oven first, then transfer the pan to it for a crisp finish. Alternatively, broil for 2-3 minutes on high, watching closely to avoid burning the crust.
Can I make this recipe ahead of time?
Prepare the crust mixture and season the fillets up to 12 hours ahead, storing them uncovered in the fridge. Refrigeration dries the surface slightly, helping the crust adhere better. Cook immediately after removing from the fridge to maintain texture. Never marinate the fish overnight—citrus acid can over-tenderize it.
Why did my crust turn out greasy instead of crispy?
Greasy crusts usually happen from overcrowding the pan or using too much butter. Cook one fillet at a time on medium heat, and reduce butter to 1 tbsp per fillet. Also ensure your skillet is hot enough—it should be smoking slightly before adding the fish. Cold pans cause butter to steam rather than crisp.